Perhaps coming to this topic merits that you know it is of paramount importance as building the site. Testing, as one famous anonymous would claim, is the fundamental process of breaking the code. In barbaric terms, testing is like giving your software a good old-fashioned beating to see if it can handle whatever you throw at it. It's like stress-testing a car to make sure it won't break down when you're driving at high speeds. Testing is all about putting your software through its paces, pushing it to the limits, and seeing if it can handle the pressure.
Could you imagine a world where software is error-free, gives a seamless awesome user experience and where services meet your demands? It is a flawless victory for all! And this world, maybe it be in our realm or virtual, is built with testing.
From unit testing to performance testing, there are different types of testing you can perform on your Drupal site to ensure it is functioning correctly. But testing can be time-consuming and tedious, especially when done manually. That's why using testing frameworks and automation tools can help make the testing process more efficient and effective. In this article, we'll unravel how you can use a powerful tool in the name of Selenium to streamline the testing process.
Selenium is a web browser automation framework used for testing web applications. It is a popular choice due to its ability to automate repetitive tasks and perform various types of testing, such as cross-browser and cross-platform testing, regression testing, and load testing.
By using Selenium, developers can improve the quality and reliability of their web application while also saving time and money in the long run. Automated testing with Selenium can be more cost-effective than manual testing, especially for large and complex web applications. With its ability to simulate user interactions and test site performance, compatibility, and functionality, Selenium is an essential tool for ensuring that web applications work correctly and meet the needs of users.
With that said, let’s cut to the chase! We will now harness the power of this automation framework in Python. W.w..ait, hol’ up!? By Python you mean what? Yes, indeed you read it right! But chill fellow, you may follow this good reads and good watch to start your first encounter with (the) Python.
Now that you’re ready, lets start getting to know Selenium.
Table of Contents
The Must-Haves
In this tutorial, we are going to use Visual Studio Code as our coding platform. Considering that Python has already been setup, first thing to do is to add the Selenium framework into your Python Environment.
pip install selenium
All done! But, just installing Selenium is not enough to make it work with your favorite web browser. We need to grab some extra drivers for that, and lucky for you, we got the download links right here: Chrome, Firefox, and Safari. We will use Chromedriver for the rest of this tutorial. Hit up the link for your browser and grab the driver that matches the version.
For this tutorial, we are going to place the chromedriver.exe inside this directory: C\webdrivers\chromedriver. This path will be used to locate our driver.
Scripting for Real
Now that you completed the prerequisites, you are now ready to create magic in scripts. (Yes, Selenium is magic. And you’ll understand it why)
Beginner’s Magic
For our first program, let us create a simple script powered by, of course, Selenium to get the page title.
- 1.from Selenium import webdriver
- 2.from selenium.webdriver.chrome.service import Service
- 3.
- 4.PATH = "C:\webdrivers\chromedriver\chromedriver.exe"
- 5.ser = Service(PATH)
- 6.op = webdriver.ChromeOptions()
- 7.browser = webdriver.Chrome(service=ser, options=op)
- 8.
- 9.browser.get("https://www.google.com")
- 10.
- 11.print(browser.title)
- 12.
- 13.browser.quit()
Lines 1-2. These lines import the necessary modules for Selenium WebDriver and Chrome Service.
Lines 4-5. These lines set the file path for the Chrome WebDriver executable and create a new instance of the Chrome Service.
Lines 6. This line creates a new instance of the ChromeOptions id, which allows customization of various browser settings.
Line 7. This line creates a new instance of the Chrome WebDriver, passing in the Chrome Service and the ChromeOptions object.
Line 9. This line instructs the browser to navigate to the specified URL, in this case, "https://www.google.com".
Line 11. This line prints out the title of the current webpage, which should be "Google".
Line 13. This line closes the browser and terminates the WebDriver session. It is always recommended to close the browser after the test execution is complete to ensure that no unnecessary resources are being utilized.
The output of the code provided will be:
This output is a result of the print(browser.title) line in the code, which retrieves the title of the current webpage and prints it to the console. Since the browser was directed to navigate to "https://www.google.com" using the browser.get() function, the title of the webpage will be "Google".
The output confirms that the script was able to successfully launch the Chrome browser, navigate to the specified URL, and retrieve the title of the webpage. It also verifies that the Chrome WebDriver is properly installed and configured on the local machine, since the webdriver.Chrome() function was able to create an instance of the Chrome WebDriver without any errors.
Overall, the output of the code demonstrates a simple, successful example of using Selenium WebDriver with Python to automate browser interactions.
After having executed your initial Selenium test with Python, it's time to explore different possibilities for selecting and interacting with you Drupal site.
Automating Drupal content creation
In your Drupal site, create a simple content type, say Products which contains the following fields:
Take note of the machine names of each webform element as this will be the backbone of our next script.
Now, navigate to /node/add/products page in your drupal site and inspect on elements on the content form. This will give you the ids of the fields. Take a look at the inspection below.


- 1.from Selenium import webdriver
- 2.from selenium.webdriver.chrome.service import Service
- 3.from selenium.webdriver.common.action_chains import ActionChains
- 4.from selenium.webdriver.support.ui import Select
- 5.from selenium.webdriver.common.by import By
- 6.import time
- 7.import os
- 8.
- 9.PATH = "C:\webdrivers\chromedriver\chromedriver.exe"
- 10.ser = Service(PATH)
- 11.op = webdriver.ChromeOptions()
- 12.op.add_experimental_option('excludeSwitches' ,['enable-logging'])
- 13.op.add_argument('--ignore-certificate-errors')
- 14.op.add_argument('--ignore-ssl-errors')
- 15.browser = webdriver.Chrome(service=ser, options=op)
- 16.action = ActionChains(browser)
- 17.
- 18.browser.maximize_window()
- 19.
- 20.create_content_path = 'https://dummy.testing/node/add/product'
- 21.browser.get(create_content_path)
- 22.
- 23.# PRODUCT Details #
- 24.p_title = 'Electric Fan'
- 25.p_number = '202310001'
- 26.p_type = 'Appliance'
- 27.p_qty = '3'
- 28.p_img = '\\images\\blue.png'
- 29.p_description = 'Best fan to blow your problems away'
- 30.
- 31.# TEXTFIELD: Product Name/Title
- 32.prod_name = browser.find_element(By.ID, 'edit-title-0-value')
- 33.action.move_to_element(prod_name).click(prod_name).send_keys(p_title).perform()
- 34.time.sleep(1)
- 35.
- 36.# TEXTFIELD: Product Number
- 37.prod_num = browser.find_element(By.ID, 'edit-field-product-number-0-value')
- 38.action.move_to_element(prod_num).click(prod_num).send_keys(p_number).perform()
- 39.time.sleep(1)
- 40.
- 41.# SELECT: Product Type
- 42.prod_ty = browser.find_element(By.ID, 'edit-field-product-type')
- 43.prod_type = Select(prod_ty)
- 44.action.move_to_element(prod_ty).click(prod_ty).perform()
- 45.prod_type.select_by_value(p_type)
- 46.time.sleep(1)
- 47.
- 48.# TEXTFIELD: Product Quantity
- 49.prod_qty = browser.find_element(By.ID, 'edit-field-product-quantity-0-value')
- 50.action.move_to_element(prod_qty).click(prod_qty).send_keys(p_qty).perform()
- 51.time.sleep(1)
- 52.
- 53.# IMAGE: Product Image
- 54.prod_img = browser.find_element(By.ID, 'edit-field-product-image-0-upload')
- 55.action.move_to_element(prod_img).perform()
- 56.prod_img.send_keys(os.getcwd() + p_img)
- 57.time.sleep(1)
- 58.
- 59.# TEXTFIELD: Product Description
- 60.prod_des = browser.find_element(By.ID, 'edit-field-product-description-0-value')
- 61.action.move_to_element(prod_des).click(prod_des).send_keys(p_description).perform()
- 62.time.sleep(1)
- 63.
- 64.# CHECKBOX: Set on Sale
- 65.sale = browser.find_element(By.ID, 'edit-field-product-sale-value')
- 66.action.move_to_element(sale).click(sale).perform()
- 67.time.sleep(1)
- 68.
- 69.# BUTTON: Submit
- 70.submit = browser.find_element(By.ID, 'edit-submit')
- 71.action.move_to_element(submit).click(submit).perform()
- 72.time.sleep(5)
Lines 1-7. The first few lines of the code are importing the necessary modules and packages for the script to run. selenium.webdriver contains the webdriver module which allows the script to interface with the web browser. ActionChains is a id that allows the script to perform complex user interactions, such as hovering and clicking, on the web page. Select is a id for interacting with dropdown menus. By is a id that provides methods to locate elements on the webpage. Service is a id used to configure and start the webdriver service. time and os are standard Python libraries that are being used in the script for additional functionality.
Lines 9-18. This block of code sets the path to the Chrome webdriver executable, creates a Service object to start the webdriver service, and sets some ChromeOptions for the webdriver instance. Then it initializes a webdriver object with the service and options provided. The ActionChains instance is created to perform complex actions. Finally, it maximizes the browser window.
Lines 20-21. These two lines define a string variable create_content_path which contains the URL to the Drupal content creation page and then navigates to that URL using the get() method of the webdriver.
Lines 23-29. These lines define some variables for the product details that will be entered in the form.
Lines 31-67. These lines locate the Product Name/Title textfield in the form using the find_element() method of the webdriver object and enters the product title using the send_keys() method of the ActionChains object. time.sleep(1) adds a one second pause to allow the browser to catch up with the script.
The subsequent blocks of code use similar methods to locate and interact with the various fields and controls of the Drupal form, filling them out with the appropriate values defined earlier in the script.
Lines 69-72. Lines. Finally, these lines locate and click the Submit button on the form using the same methods as before, and then pause the script for five seconds to allow the form submission to complete.
Voila, a new content is made! Check the admin contents page to confirm the magic!
Overall, the code demonstrates how Selenium WebDriver can be used in Python to automate the filling out and submission of web forms, in this case for creating Drupal content. This can save developers a lot of time and effort, especially when testing web applications that involve complex forms or multi-step workflows. By automating these tasks, developers can focus on other aspects of their projects, such as improving the user interface or optimizing website performance. In addition, Selenium WebDriver can help ensure that web applications are tested thoroughly and consistently, which can help prevent bugs and other issues from arising in production.
Working with webforms
Having fun? Let's make it even greater with another example. This time we are going to do it with a Drupal Webform.
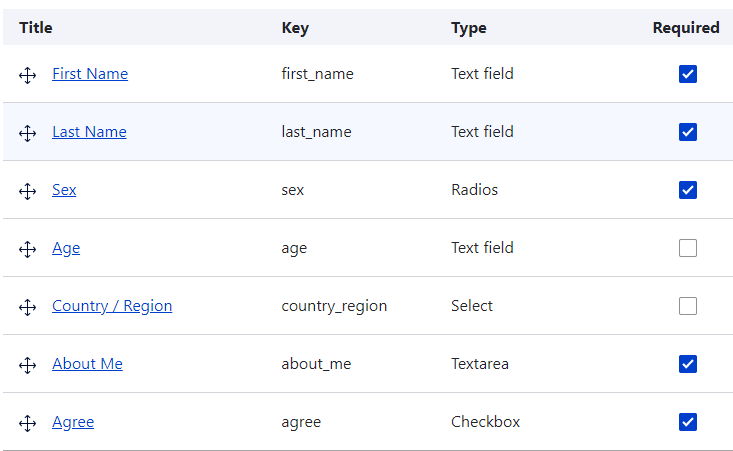
Create a webform and name it User Profile with the following fields:
Now, visit the newly created webform. Inspect elements on the webform and take note of the IDs of each form element.


Create a new python program and write the following code.
- 1.from Selenium import webdriver
- 2.from selenium.webdriver.chrome.service import Service
- 3.from selenium.webdriver.common.action_chains import ActionChains
- 4.from selenium.webdriver.support.ui import Select
- 5.from selenium.webdriver.common.by import By
- 6.import time
- 7.
- 8.
- 9.PATH = "C:\webdrivers\chromedriver\chromedriver.exe"
- 10.ser = Service(PATH)
- 11.op = webdriver.ChromeOptions()
- 12.op.add_experimental_option('excludeSwitches' ,['enable-logging'])
- 13.op.add_argument('--ignore-certificate-errors')
- 14.op.add_argument('--ignore-ssl-errors')
- 15.browser = webdriver.Chrome(service=ser, options=op)
- 16.action = ActionChains(browser)
- 17.
- 18.browser.maximize_window()
- 19.
- 20.webform_path = 'https://dummy.testing/profile'
- 21.browser.get(webform_path)
- 22.
- 23.# TEXTFIELD: First Name
- 24.first_name = browser.find_element(By.ID, 'edit-first-name')
- 25.action.move_to_element(first_name).click(first_name).send_keys('Juan').perform()
- 26.time.sleep(1)
- 27.
- 28.# TEXTFIELD: First Name
- 29.last_name = browser.find_element(By.ID, 'edit-last-name')
- 30.action.move_to_element(last_name).click(last_name).send_keys('Dela Cruz').perform()
- 31.time.sleep(1)
- 32.
- 33.# RADIOS: Sex
- 34.sex = browser.find_element(By.ID, 'edit-sex-male')
- 35.action.move_to_element(sex).click(sex).perform()
- 36.time.sleep(1)
- 37.
- 38.# TEXTFIELD: Age
- 39.age = browser.find_element(By.ID, 'edit-age')
- 40.action.move_to_element(age).click(age).send_keys('25').perform()
- 41.time.sleep(1)
- 42.
- 43.# SELECT: Country / Region
- 44.country = Select(browser.find_element(By.ID, 'edit-field-product-type'))
- 45.country.select_by_value('Philippines')
- 46.time.sleep(1)
- 47.
- 48.# TEXTAREA: About Me
- 49.about_me = browser.find_element(By.ID, 'edit-about-me')
- 50.action.move_to_element(about_me).click(about_me).send_keys('I am a happy person who loves exploring and enjoys my work. I find fulfillment in discovering new things and experiencing all that life has to offer.').perform()
- 51.time.sleep(1)
- 52.
- 53.# CHECKBOX: Agreement
- 54.agree = browser.find_element(By.ID, 'edit-agree')
- 55.action.move_to_element(agree).click(agree).perform()
- 56.time.sleep(1)
- 57.
- 58.# BUTTON: Submit
- 59.submit = browser.find_element(By.ID, 'edit-submit')
- 60.action.move_to_element(submit).click(submit).perform()
- 61.time.sleep(5)
Run the script! Take a look at how the Selenium animates the automation.
The Reckoning
Overall, creating automation scripts using Selenium for testing, content creation, and other tasks in Drupal sites can greatly improve efficiency and reduce the risk of errors. By automating repetitive tasks, developers and content creators can focus their time and energy on more critical aspects of the site, such as functionality and design.
However, it's important to keep in mind that creating automation scripts requires a certain level of technical expertise, and may not be suitable for everyone. Additionally, scripts should be regularly updated and maintained to ensure they continue to function properly as the site evolves. With careful planning and execution, however, automation scripts can be a powerful tool for improving workflow and productivity in Drupal site development and management.